
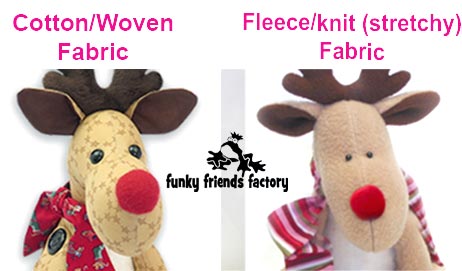
I made this photo tutorial so you can see how to sew my Reindeer Sewing Pattern ~> scroll down for step-by-step photos!

.
*** PLEASE NOTE – this is ONLY a PHOTO TUTORIAL ***
The FULL PATTERN IS NOT included here.It is NOT A FREE PATTERN!
I have made this photo tutorial so people who have purchased my Reggie Reindeer Sewing Pattern can SEE how to sew a reindeer toy! (I wanted to explain this so you are not disappointed if you have found this page via a search engine and not from the link in my Funky Friends Factory Reggie Reindeer Sewing Pattern)
Don’t like button-jointing?
DONT WORRY!
Reggie can also be made with or without the button joints, you decide!
I have created a photo-tutorial to show you how to make him with the ARMS and LEGS sewn into the seams
instead of the traditional button joints.

HEAD & EARS:
STEP 1
Sew the FACE PIECES together from N, at the nose to O.
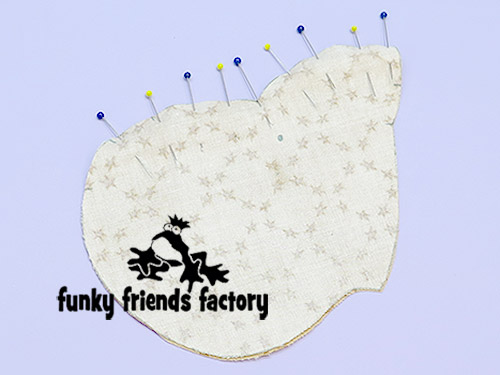
STEP 2
Sew the NECK PIECES together down the back seam, from O – P at the top.
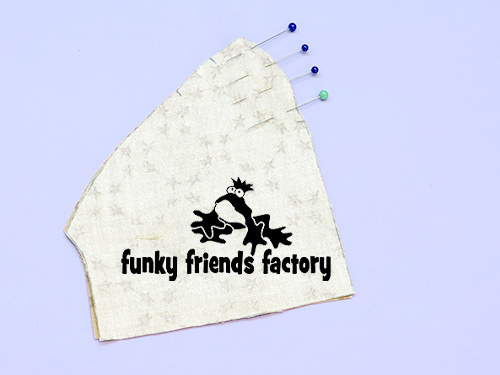
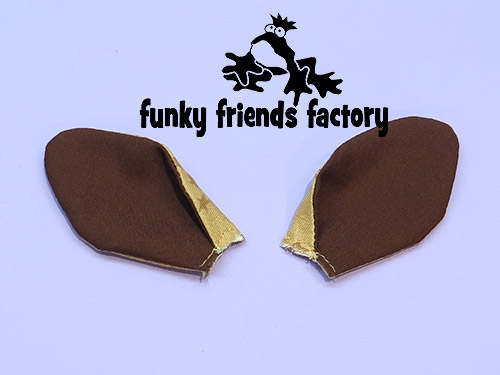
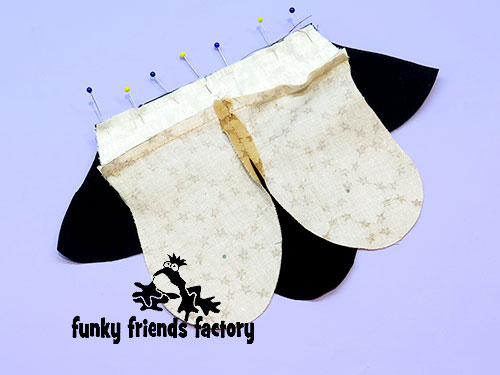
EARS:
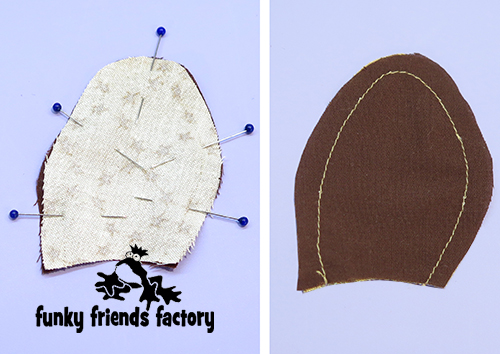
STEP 3a
Sew the EAR PIECES together in pairs (one dark to one light brown piece).
STEP 3b
Turn the EARS right side out.
TIP: I like to use a wooden chopstick to help turn the seams nicely. Run the end of the stick back and forth along the stitching inside until the seam is nice and smooth.
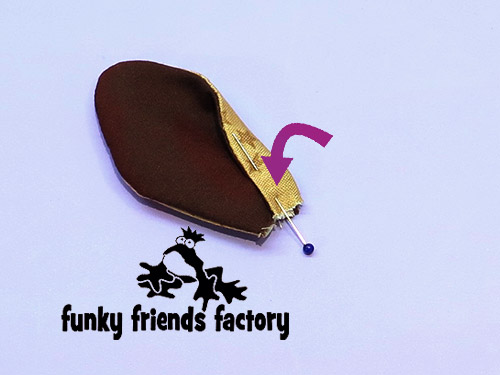
STEP 3c
Fold the top edge of each EAR inwards to the middle and sew them with a tacking stitch to keep them in this position.
TIP: Fold them in opposite directions so you have a RIGHT and LEFT EAR!

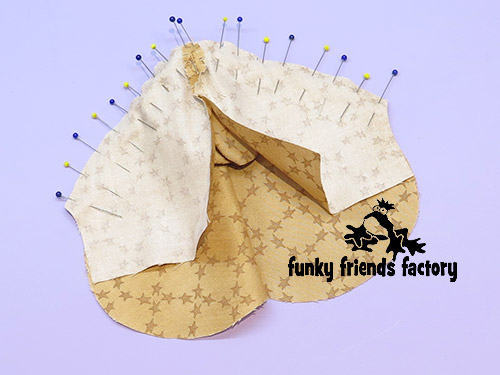
STEP 4
Place the EARS in position on the FACE PIECES, between the pattern markings, (with the fold facing the FACE PIECE). Tack them in place and check that they will be facing forward).

STEP 5
Sew the NECK PIECES to the FACE PIECES , from R – O – R, with the ears in between them.
EYES:
STEP 6
If you are using CRAFT EYES, insert them now.
TIP: I have a tutorial to show you how to insert craft eyes on my blog.


HEAD continued…
STEP 7
Sew the FACE & NECK PIECES closed at the front. Sew from the nose to the neck, N – R, and continue down the front of the NECK PIECES from R – E.

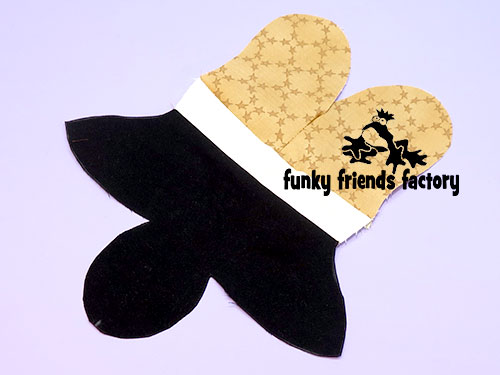
BODY:
STEP 8
Sew theTUMMY PIECES together from E – F, matching the dot pattern markings.

STEP 9
Sew the BODY PIECES together at the back from H – K.
TIP: Transfer the pattern markings for the ARM and LEG positions to the right sides of the fabric so you will be able to see where to place them AFTER you have stuffed your Reindeer!
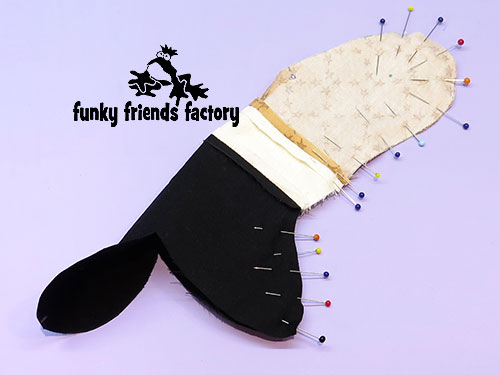
STEP 10
Sew the BODY PIECES to the TUMMY PIECES at the side seams from L – M.
STEP 11
Sew the BASE PIECE in place, matching F, M and K.
STEP 12
Sew the NECK PIECES to the TUMMY & BODY PIECES at the neck seam from S – E – S.
TIP: I find the best way to do this is to turn the head right sides out and position it ‘inside the body’ so you can pin the pieces together at the neck seam, with the fabric right sides together.

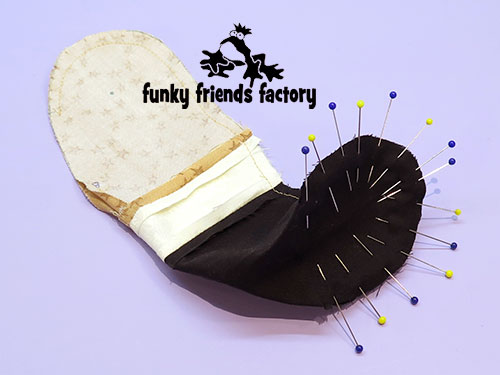
STEP 13
Pull the head back out of the body and sew the NECK PIECES closed from P – S, remembering to leave a gap open for turning between S and H.

STEP 14
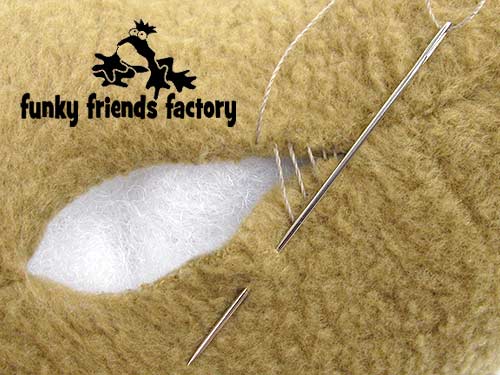
Turn your reindeer right sides out and stuff the face, neck and body.
TIP: The reindeer should be well stuffed, especially the neck because it provides support for the reindeer to be able to sit up.

LEGS:
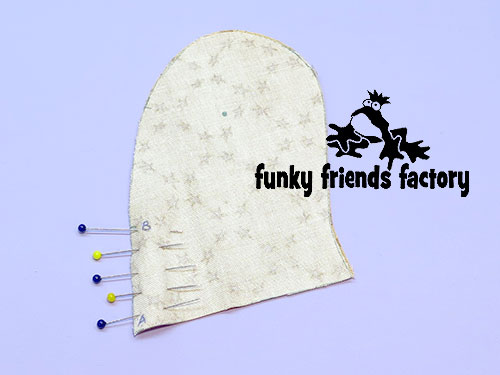
STEP 15a
Sew the LEG PIECES together from A – B.
STEP 15b
Sew the LEG PIECES to the top of the FUR PIECES, from D – A – D.
STEP 15c
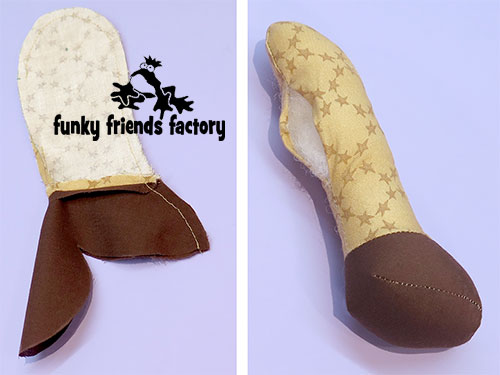
Sew each BOOT PIECE to the bottom of each FUR PIECE.
THIS is what the leg should look like from the right side.
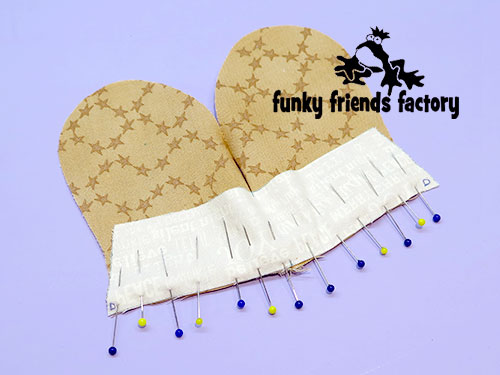
STEP 16a
Fold each LEG in half with right sides facing and sew the rest of the leg seam closed. Sew from C – D, leaving a gap open (between B and C). Continue sewing down the side seam of the BOOT PIECE to G.
STEP 16b
Fold the base of each BOOT PIECE up and pin the side seams. Sew around the front of the BOOT PIECE from E – F.
STEP 17
Stuff the BOOT quite firmly with toy stuffing. Fill the LEGS, don’t stuff the top of the LEGS too firmly as they will be sewn flat.

ARMS:
STEP 18
Sew the arms in the same way as the legs, except NO fur pieces!
STEP 19
Sew the ARMS and LEGS and BACK PIECES closed with a ladder stitch.

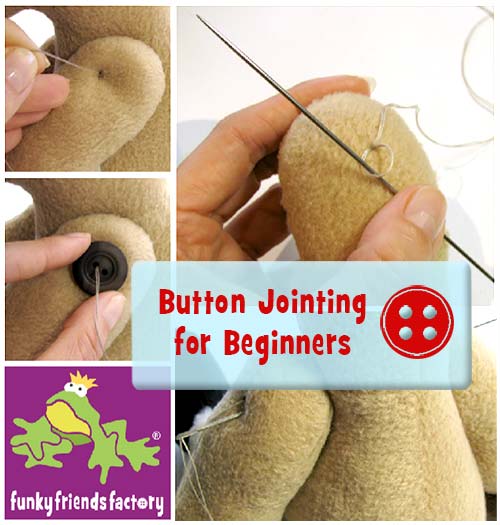
BUTTON JOINTS:
STEP 20
Using strong thread, (double up if necessary), sew the LEGS to the body with a very long doll’s needle. Sew back and forth a few times, pulling the LEGS into the body a bit. I like to make sure that the LEGS are tight, as they will loosen up a bit with time. Make the LEGS tight enough so that they will stay in a sitting position, but will still be able to swivel, if you want your reindeer to be able to be moved into a standing position as well. Sew a button for decoration over your previous stitches.
TIP: If you haven’t button-jointed a toy before DON”T PANIC – I have created a detailed, step-by-step button-jointing photo tutorial to help you!!!

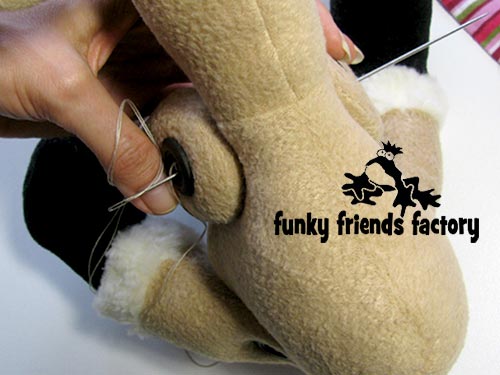
STEP 21
Sew the ARMS to the body in the same way. Use strong thread to secure them. Make sure that the ARMS can just turn around. Sew on the buttons for decoration.
EYES:
STEP 22
If you are using beads, sew them on now.
TIP: When I use Fleece fabric, I like to use smaller black beads (½ inch/6mm) place them closer together, than for the eye position on the pattern pieces.

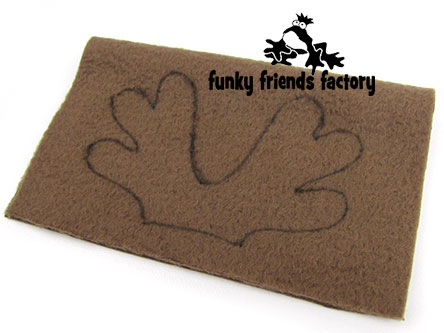
ANTLERS:
STEP 23a
Trace the ANTLERS PIECE onto a double layer of fleece, Cuddle (or similar stretchy fabric) with the right sides together!.
STEP 23b
Sew the ANTLERS PIECES together on the sewing line.
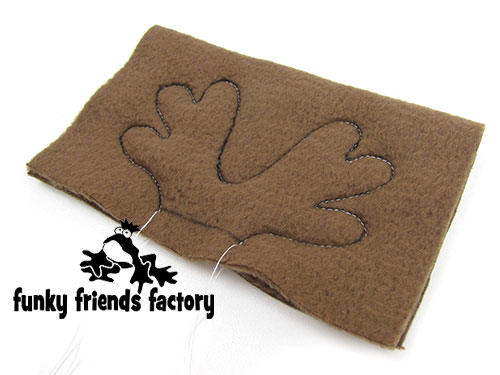
STEP 24a
Cut around the sewing line with a 3mm(⅛inch) seam allowance.
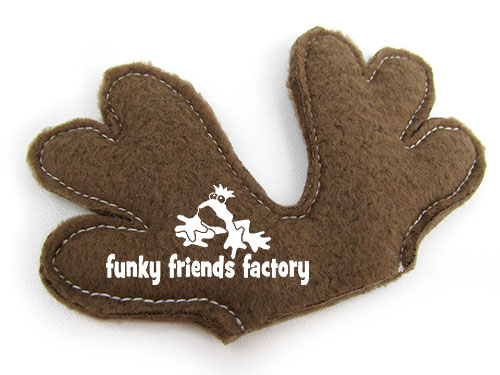
STEP 24b
Clip the seam allowance, especially where it is very curved then turn the ANTLERS PIECES right sides out.
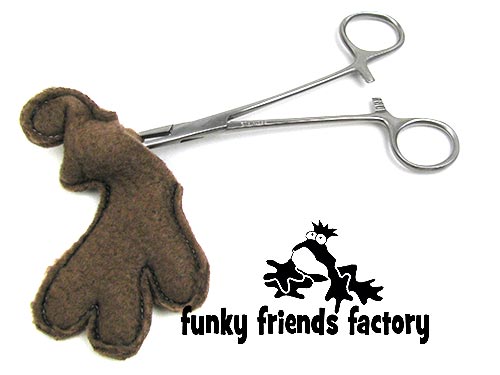
TIP: If you don’t have haemostats (medical clasps) – I have a special toy-making tip to show you how to turn small toy pieces.

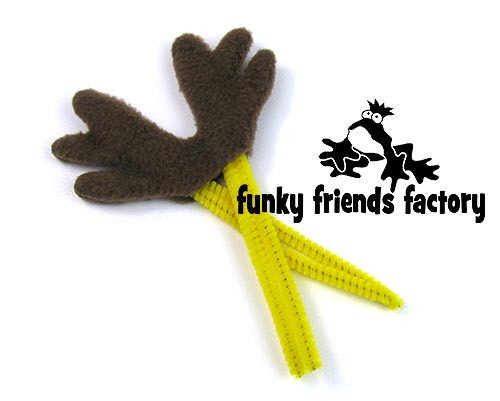
STEP 26
Place a piece of chenille stick/florist’s wire in each side of the ANTLERS, as shown on the pattern, then stuff them with toy stuffing.
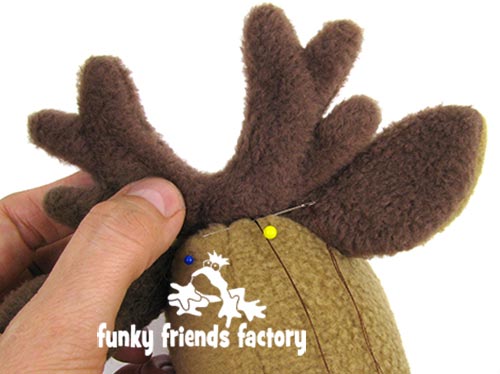
STEP 27
Turn the open edges in and sew the ANTLERS closed at the base, then sew them to the head between the ears, using a strong thread.
NOSE:
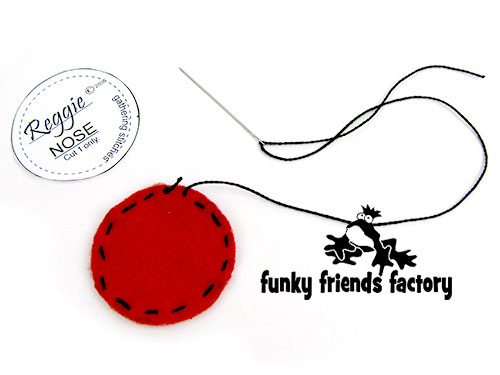
STEP 28a
Use a strong thread and a running stitch to gather the NOSE PIECE to form a cup shape.
STEP 28b
Fill this with stuffing and pull tightly to gather the NOSE PIECE to form a ball. Sew the NOSE closed and finish off securely. Sew the NOSE in position on the reindeer’s face. Use strong thread and a ladder stitch all around the NOSE to hold it firmly to the face.
STEP 28c
Sew the NOSE closed and finish off securely. Sew the NOSE in position on the reindeer’s face. Use strong thread and a ladder stitch all around the NOSE to hold it firmly to the face.

SCARF:
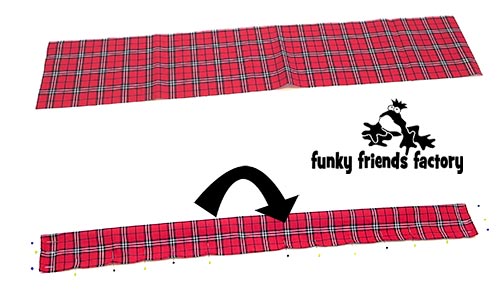
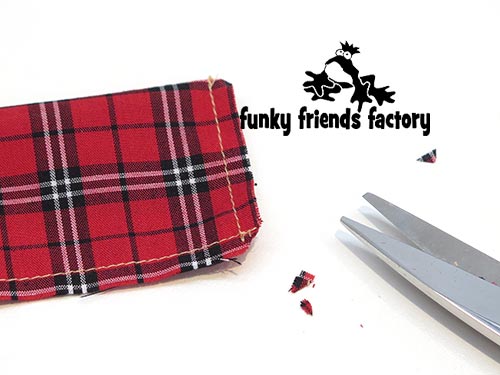
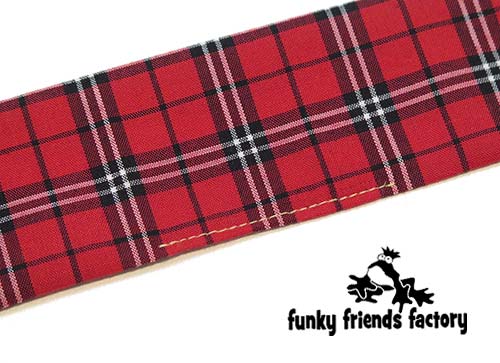
STEP 29a
To make the SCARF cut a piece of striped fabric 20inches long and 4 inches wide (50cm x 10cm). Fold it in half lengthwise. Sew it closed leaving a gap.
TIP: I click the corners before turning so they turn nicely!
STEP 29b
Turn the SCARF right sides out. Turn and sew the opening closed. Give the scarf a gentle iron so that it will lie flat then tie it around Reggie’s neck.
(* Christmas ribbon also makes a great scarf!)
Your Reggie Reindeer is ready to LOVE!
Come join the fun on Facebook!
![]()
I LOVE to see how your Funky Friends toys turn out!
When you’ve made your own stuffed toy Reggie Reindeer you can come show him off ~>
Post a photo on my Funky Friends Factory Facebook page for me to see and YOU could win a FREE PATTERN!

Till next time,
Happy Sewing,
Pauline
![]()
