
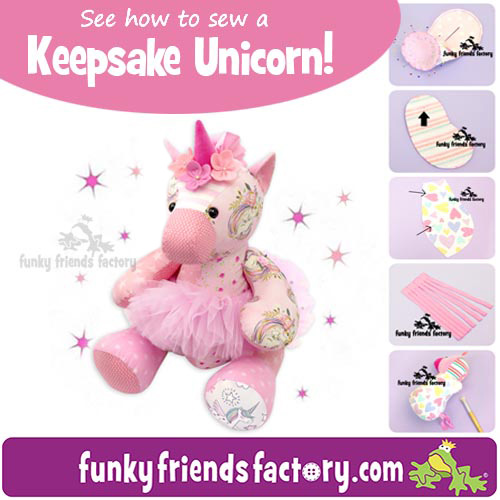
I made this photo tutorial so you can see how to sew my Keepsake Unicorn Sewing Pattern.
Scroll down for step-by-step photos! ~>
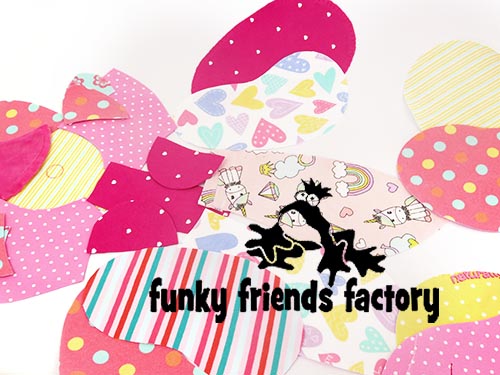
First choose some fabric (or preloved clothes!
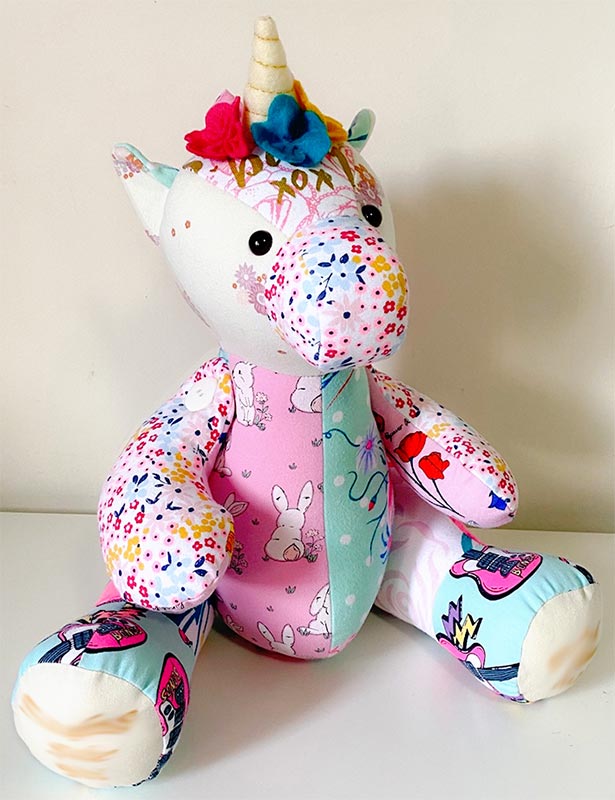
Kelsey is designed to be a memory toy sewn from pre-loved clothing BUT you can see )her with any fabrics from quilting cottons to fleece!
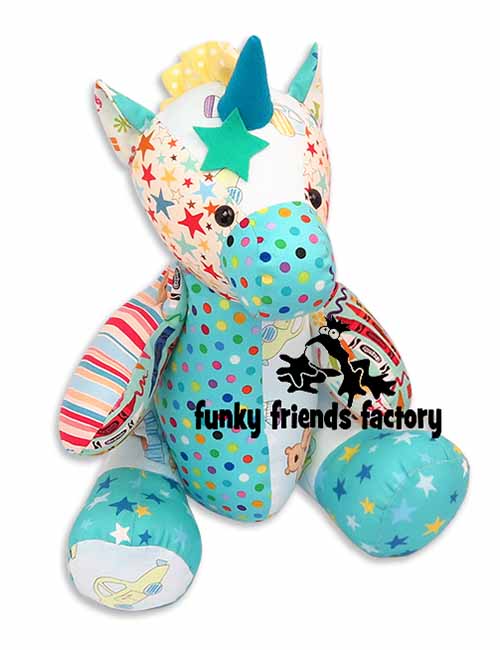
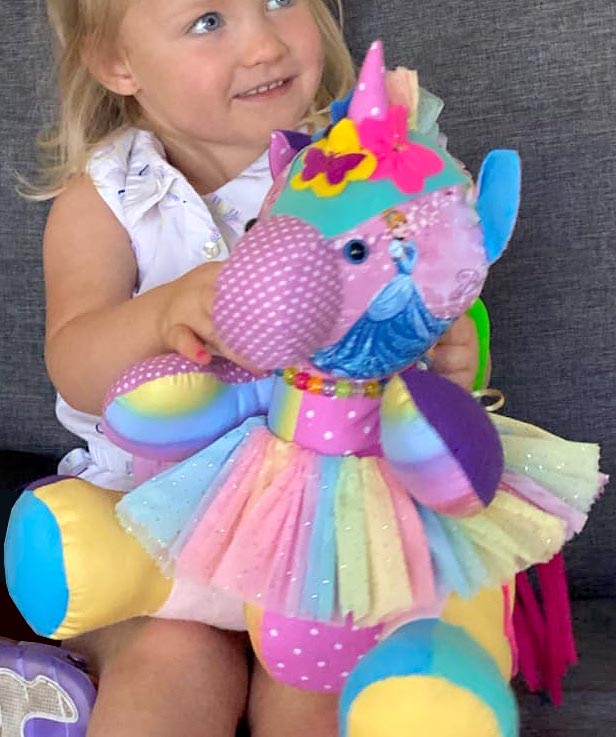
A Keepsake Unicorn will look great in any colour… look how sweet this little fellow is in blues…
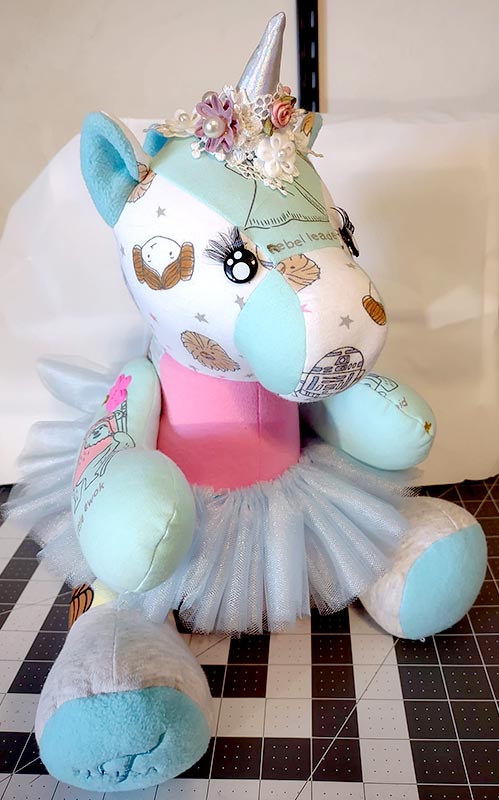
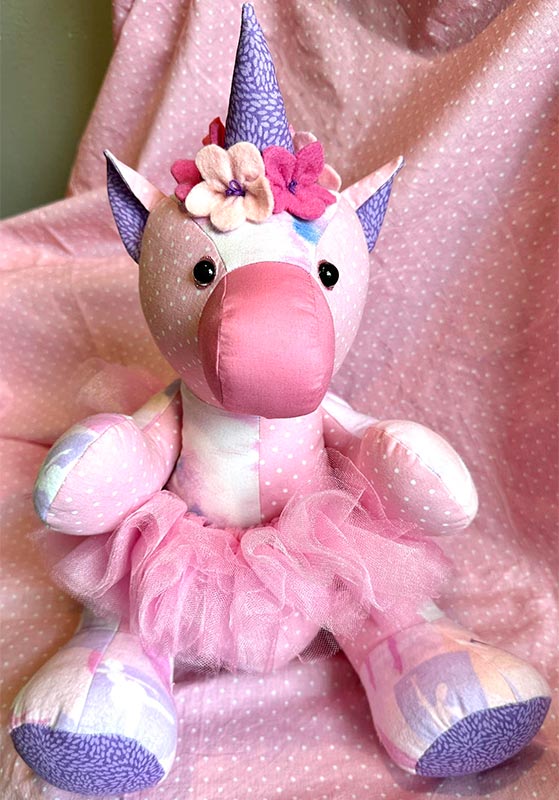
and baby clothes…
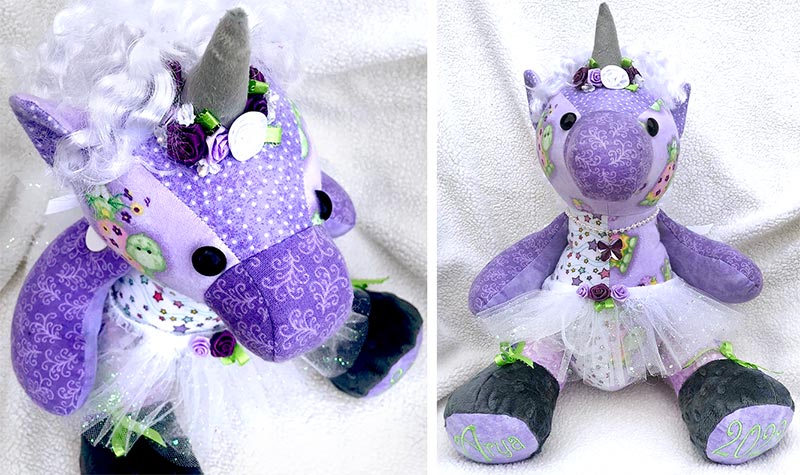
And purple and pinks too…
*** PLEASE NOTE – this in ONLY a PHOTO TUTORIAL ***
The FULL PATTERN IS NOT included here.
It is NOT A FREE PATTERN.I have made this photo tutorial so people who have purchased the pattern can SEE how to sew a keepsake unicorn (I wanted to explain this so you are not disappointed if you have found this page via a search engine and not from the link in my Kelsey Keepsake Unicorn sewing pattern!)
*The Keepsake Unicorn Pattern is NOW available to buy, from the Funky Friends Factory website as an Instant Download e-Pattern.
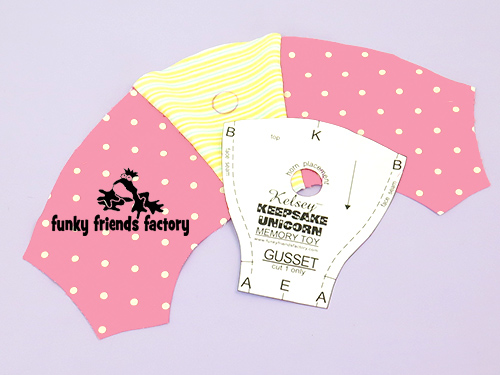
Prepare the fabric pieces:
STEP 1a
Trace all the PIECES, including all the ‘reversed pieces’, onto the smooth (NON-STICKY) side of the iron-on interfacing. Cut out the pieces adding about 3mm (⅛ inch) around them. Iron the interfacing pieces onto the fabric of the clothing items, with the STICKY (GLUE) side facing the BACK of the fabric.
STEP 1b
Cut the PIECES out on the traced lines.
TIP: I use about 8 – 10 items of baby clothes for my Keepsake Unicorns. Mix and match your fabrics to make your keepsake unique. If you are making a ‘patchwork toy’ (with many different fabrics) – take a photo of the pieces all cut out. It is easy to forget where you wanted to place things as you go along!
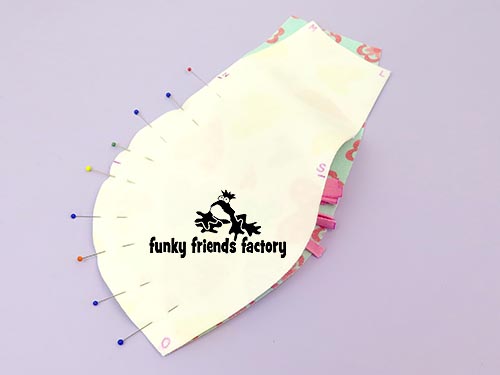
Face & Gusset:
STEP 2a
Sew the GUSSET PIECE to the FACE PIECES.
Sew along the face seam from A – B on one side…
STEP 2b
…and on the other side.
STEP 3
Trace the HORN position onto the GUSSET PIECE now because it’s easy to do this while the piece is flat!.
TIP: Cut a hole in the GUSSET PATTERN PIECE TEMPLATE so you can trace the horn position marking onto the right side of the fabric GUSSET PIECE.
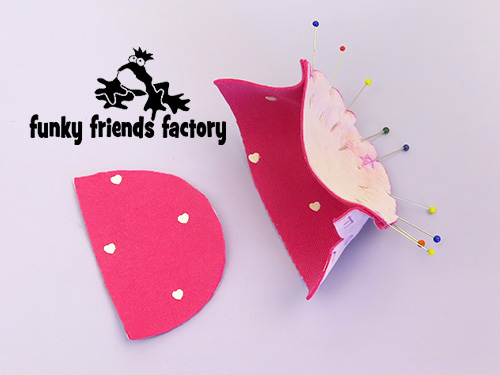
Muzzle & Face:
STEP 4a
Pin the SIDE MUZZLE PIECES to the MIDDLE MUZZLE PIECE, matching the star pattern markings.
Sew from A – D, on one side.
TIP: Sew with the SIDE MUZZLE PIECE down.
STEP 4b
Clip the seam well.
STEP 4c
Sew from A – D, on the other side to form a cup shape.
STEP 4d
Clip this seam really well and turn the MUZZLE PIECES right sides out.


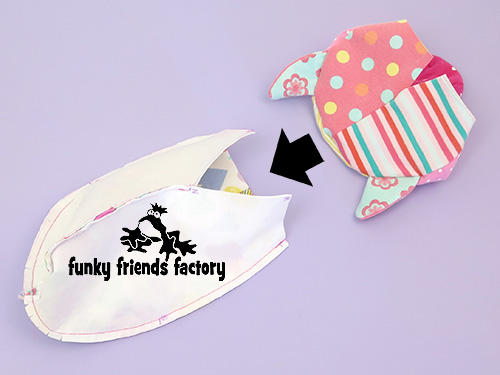
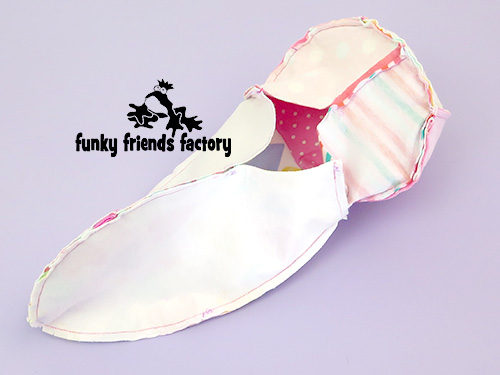
STEP 5a
Pin and sew the MUZZLE PIECES to the GUSSET & FACE PIECES, matching point E in the middle.
STEP 5b
Sew the MUZZLE PIECES to the GUSSET & FACE PIECES from F – D – A – E – A – D – F.
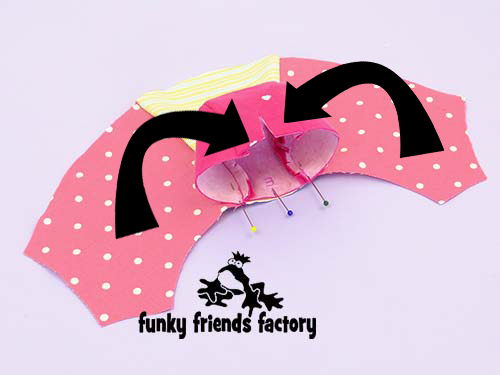
STEP 6
Sew the MUZZLE & FACE PIECES closed at the front, from G – F – H.
Ears:
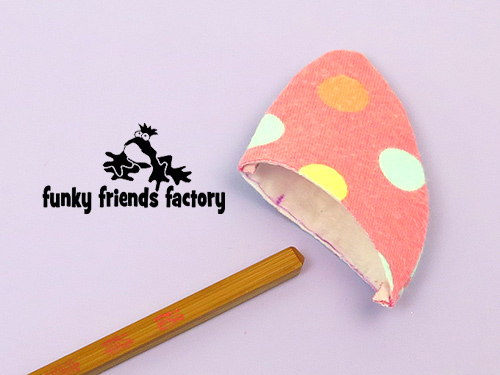
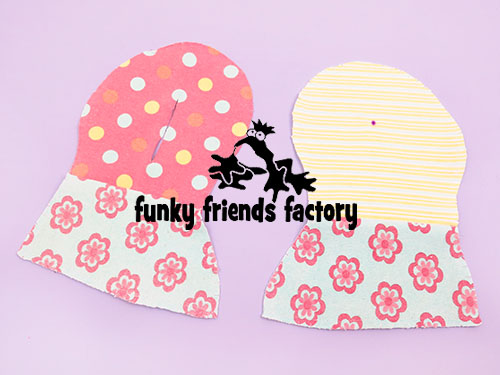
STEP 7a
Pin and sew the EAR PIECES together in pairs (1 Main and 1 Contrast piece).
STEP 7b
Trim the seams at the ‘tips’ to 3mm(⅛inch).

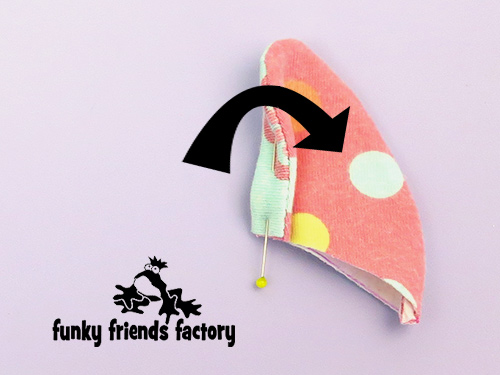
STEP 8a
Turn the EARS right side out.
STEP 8b
Fold the EARS, as shown by the pattern markings and pin them in this position.
(Make sure you have a right and a left EAR!)
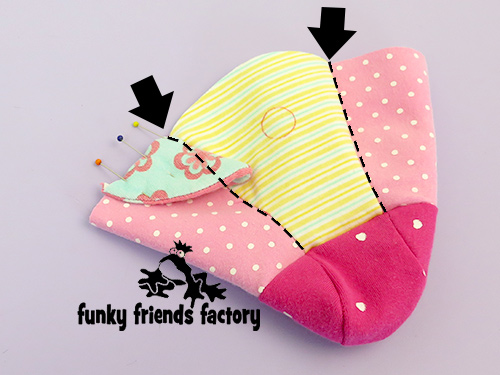
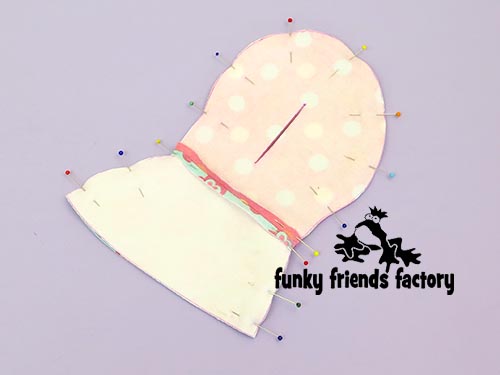
STEP 9a
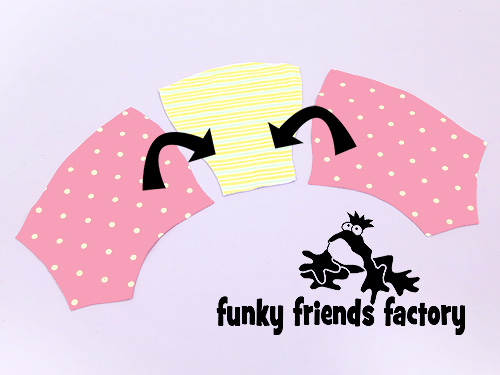
Using the pattern markings to guide you with the placement, pin the EARS to the FACE PIECES with the fold facing/touching the FACE PIECES.
*Line up the folded edge of each EAR with the face seam at point B.
( see the black arrows in the photo below).
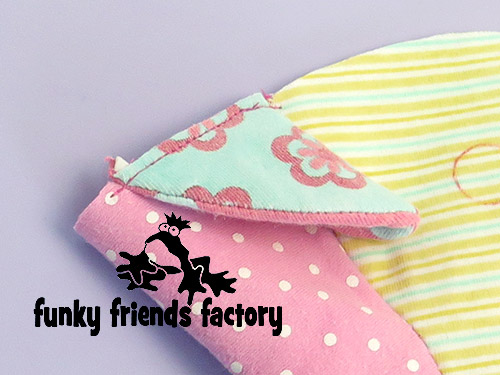
STEP 9b
Sew the EARS in place with a 3mm (⅛ inch) seam allowance.
TIP: This is VERY important because it will stop the EARS from slipping as you sew the head together. (Crooked ears will make your Unicorn look wonky!
)
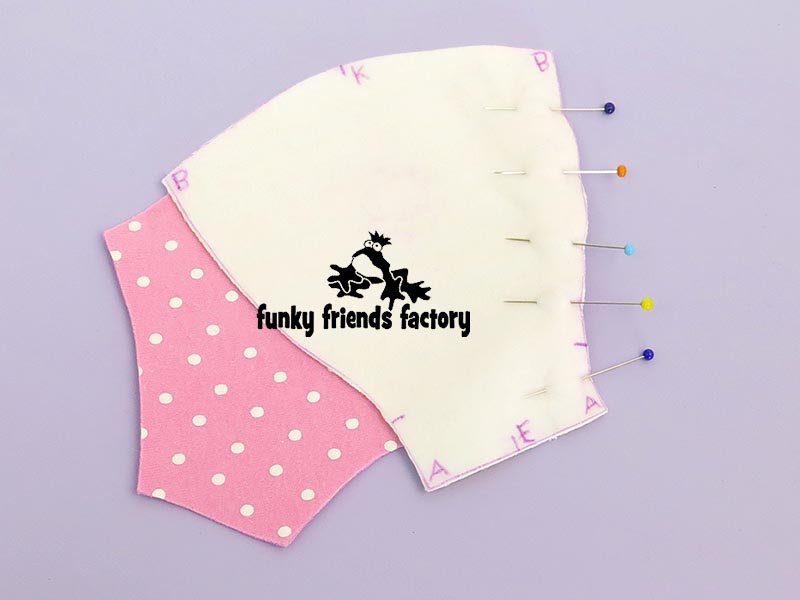
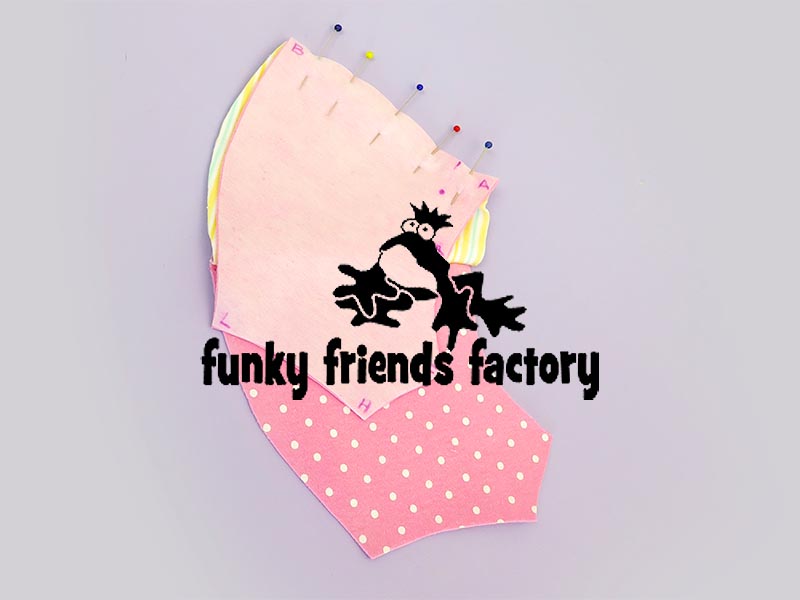
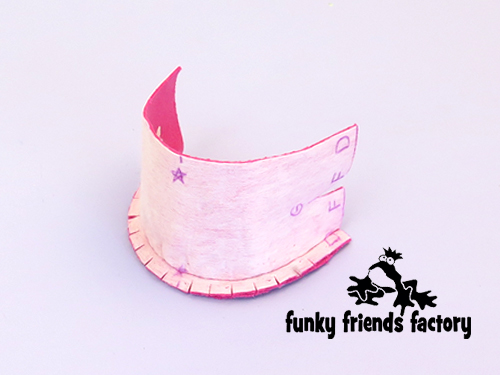
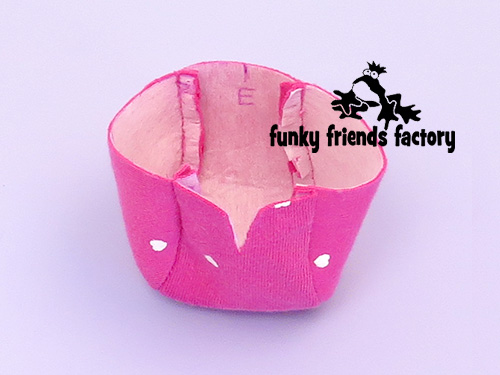
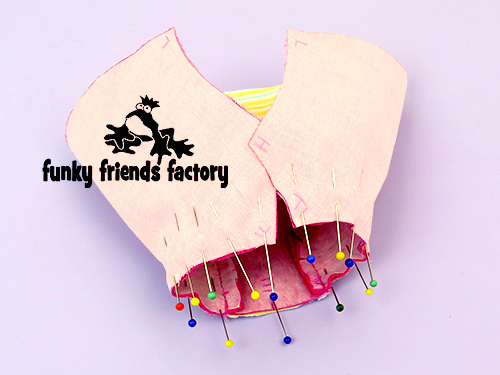
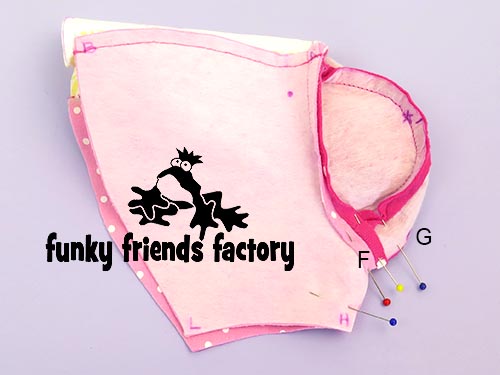
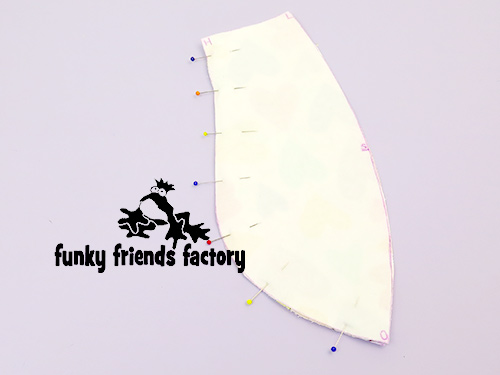
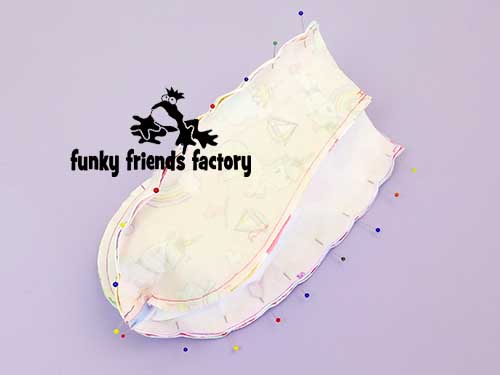
Back Head:
STEP 10
Sew the BACK HEAD PIECES together, from K – P (leave this seam open from P and M).
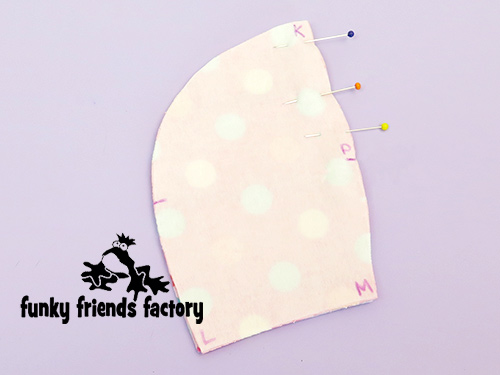
STEP 11
Sew the BACK HEAD PIECES to the GUSSET & FACE PIECES from L – B – K – B – L, with the EARS in between.

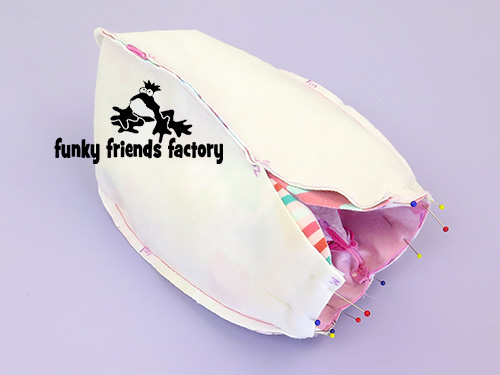
Eyes:
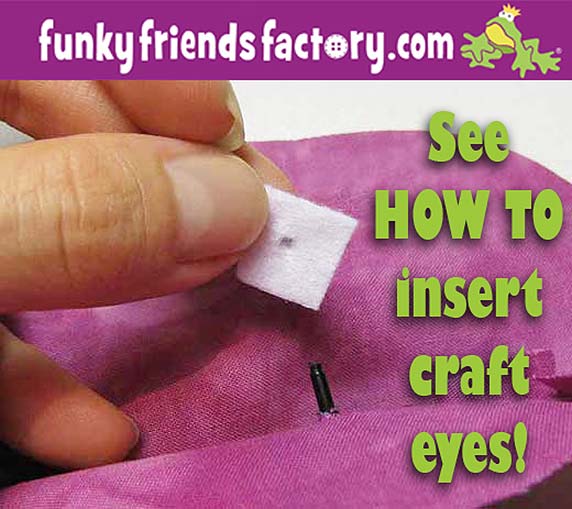
STEP 12
Turn the head right sides out. If you are using CRAFT EYES insert them now.
❌ IMPORTANT TOY SAFETY NOTE: ❌If the toy is for a child under 3 it is safest to use a black felt circle or embroider a black circle instead of using CRAFT EYES. Do this later, AFTER you have stuffed the unicorn. Please remember – a keepsake / memory toy that will be given to a baby (or child under 3 years old) should NOT have any small parts like buttons, craft eyes or weighted pellets! You can check out this blog post for more toy safety information.
TIP: If you haven’t used craft eyes before – I have a tutorial to show you how to insert craft eyes on my blog.
Tail:
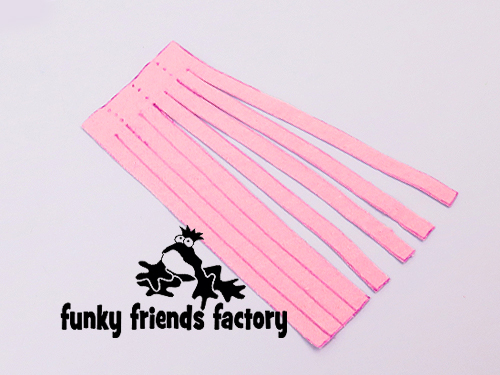
STEP 13a
Use a thin fabric, like the knit from baby clothing, for the TAIL PIECE . *** DON’T interface it!*** Cut the tassels in the TAIL PIECE as shown on the pattern markings.
STEP 13b
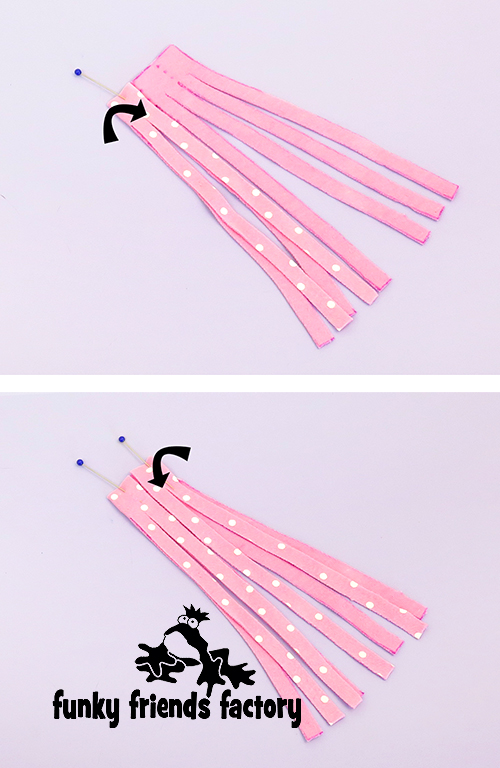
Fold the sides of the TAIL PIECE to the center, at the top, with the WRONG sides of the fabric together.
STEP 13c
Fold the top of the TAIL PIECE in half to form 4 layers and pin the layers together to hold them in this position.

Back:
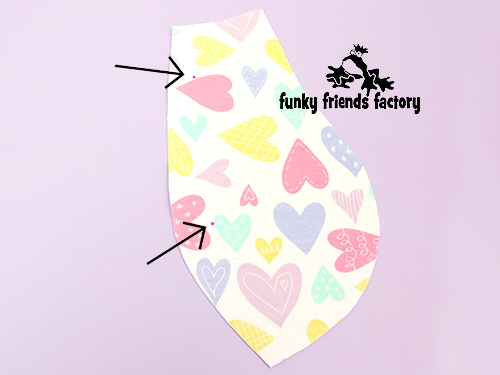
STEP 14
Mark the position for the button joints on the RIGHT side of the fabric of the BACK PIECES (this will be on the outside of the body).
TIP: This is VERY IMPORTANT so that you know where to push the needle through AFTER the parts are stuffed!!!!
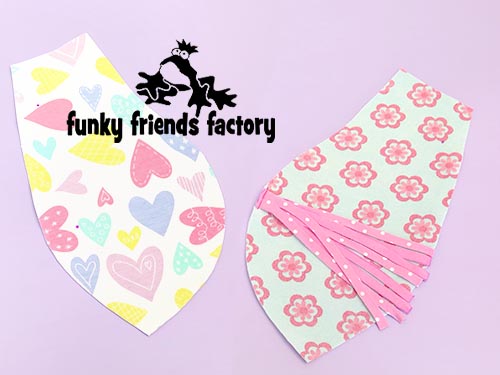
STEP 15
Pin the TAIL in place on one of the BACK PIECES and sew it in place with a 3mm (⅛ inch) seam allowance.
STEP 18
Sew the BACK PIECES together along the back seam, from N – O, leaving this seam open at the top between M and N.
Front:
STEP 19
Sew the FRONT PIECES together along the front seam from H – O.
STEP 20
Sew the FRONT and BACK PIECES together at the sides from L – O – L.
Neck Seam:
STEP 21
Sew the head and body together at the neck seam. Sew from M – L – H – L – M.
TIP: I find the best way to do this is to turn the head right sides out and position it ‘inside the body’ so you can pin the pieces together at the neck seam, with the fabric right sides together.
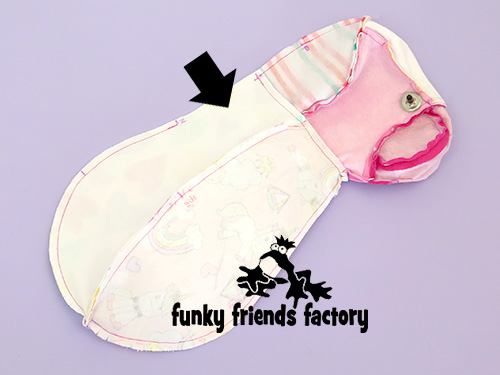
STEP 22a
Pull the head back out of the body.
STEP 22b
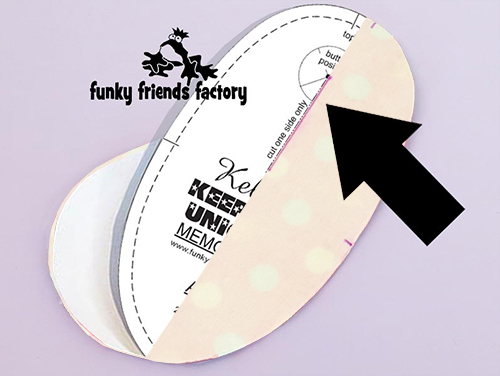
Sew the BACK HEAD PIECES closed from P – M. (Don’t sew the stuffing gap closed – see the black arrow in the photo below)
Arms:
STEP 23a
Mark the position for the button joints on the RIGHT side of the fabric of all 4 ARM PIECES. (This will be on the outside of the arms so that you will know where to push the needle through the arms for the button jointing).
STEP 23b
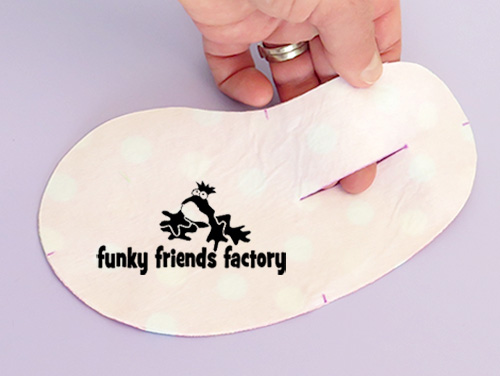
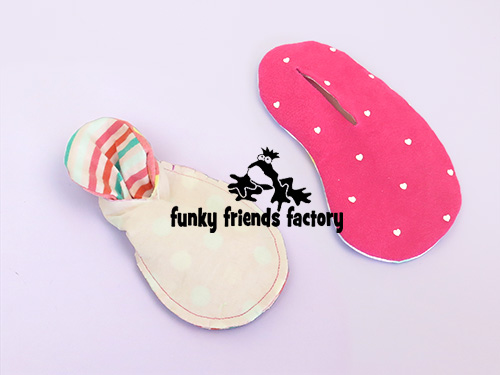
Cut a slit in 2 of the ARM PIECES, as shown on the pattern markings. ONLY cut 2 of the ARM PIECES – one right and one left! (reversed).
TIP: If you fold the ARM PIECE template along the cutting line it makes it easy to mark exactly where you need to cut the slits.
STEP 24a
Pin and sew the cut ARM PIECES to the uncut ARM PIECES in pairs. Sew right around without leaving a gap.
STEP 24b
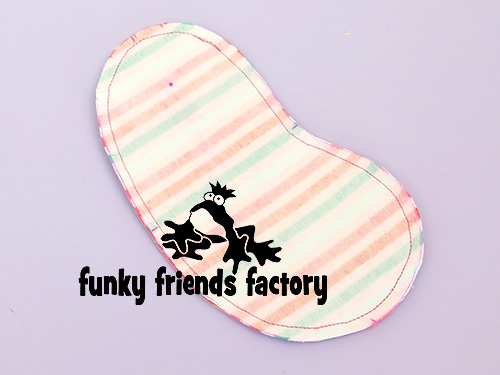
Clip all curved edges and then turn the ARMS through the slits.
STEP 24c
Stuff the ARMS and sew the slits closed with a ladder stitch. (This hand stitching will be ‘hidden’ from sight when your toy is finished but be as neat as you can. I find it is neatest if I sew towards the button position).

Legs:
STEP 25
Sew the HOOF PIECES to the LEG PIECES from Q – R.
STEP 26
Mark the position for the button joints on the RIGHT side of the fabric of all 4 LEG PIECES (this will be on the outside of the legs). Cut a slit in 2 LEG PIECES, as shown on the pattern markings, making sure you have a right and left leg (reversed).
STEP 27
Pin and sew the cut LEG & HOOF PIECES to the uncut LEG & HOOF PIECES in pairs.
STEP 28
Snip the curved seams then sew the HOOF PAD PIECES to the HOOF PIECES. Snip the curved seams around the FOOT PIECES.
TIP: I have a tutorial on my blog to show you how to sew perfect plushie feet – it’s easy when you know how!


STEP 29
Turn and stuff the LEGS through the slits. Sew the slits on the LEG PIECES closed with a ladder stitch. (Again, sew up towards the button position and be as neat as you can).
Assembly:
STEP 30a
Turn the body and head right sides out.
STEP 30b
Stuff the unicorn’s head and body with toy stuffing. (This should be very well stuffed, especially the neck, as it provides support for the head.)
STEP 30c
Sew the BACK PIECES closed with a ladder stitch.
TIP: I find it looks neater if you sew UP towards the neck seam so your finishing off stitches will be hidden under the Unicorn’s mane.

Button Jointing is easy! (Link to tutorial with VIDEO in TIP box)
STEP 31
Sew the LEGS to the body with a very long doll’s needle, using strong thread. Sew through one LEG, through the body and out through the other LEG, sew back through and come out where you started. Sew back and forth a few times, pulling the LEGS into the body a bit. Once the LEGS are secure, sew a button (or a ribbon rose!) over your previous stitches.
TIP: I have a photo tutorial on my blog with step-by-step photos to show you exactly how to do button jointing HERE – it’s easy when you know how!
STEP 32
Sew the ARMS to the body in the same way as the LEGS. Use the strong thread to secure them first, then sew on the buttons (or ribbon roses!) for decoration.
TIP: I like to make sure that the ARMS and LEGS are tight, because they will loosen up a bit with time. Pull them quite tight so that they will stay in a sitting position, but will still be able to swivel, if you want your bear to be able to be moved into a standing position as well.
Horn:
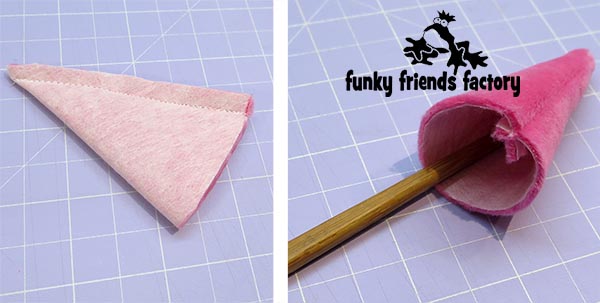
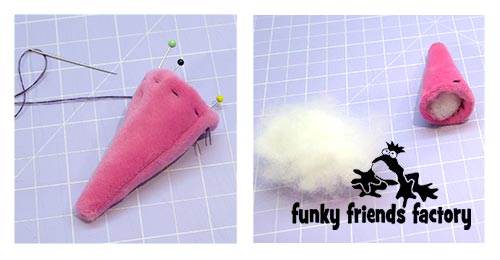
STEP 33a
Fold the HORN PIECE and sew it closed at the side seam. Turn the HORN PIECE right sides out.
STEP 33b
Fold under a 5mm (¼inch) seam at the base of the HORN and had sew this to hold it under. Stuff the HORN with toy stuffing.
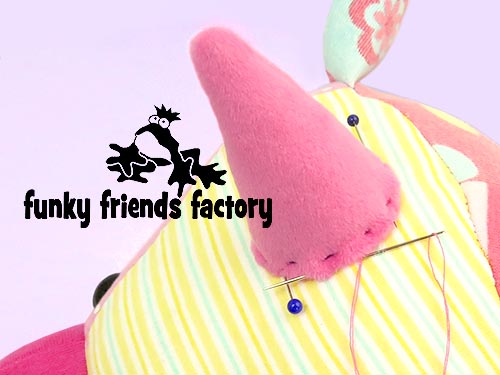
STEP 33c
Sew the HORN in place on the GUSSET PIECE.
Mane:
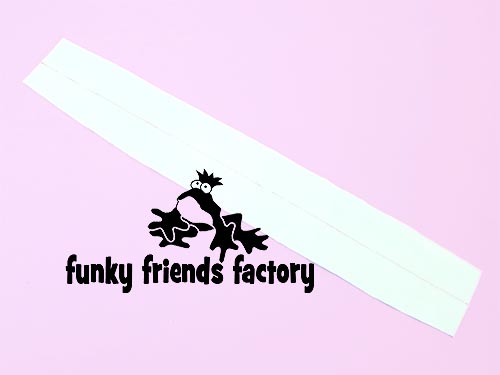
STEP 34a
NOTE: I have included a MANE PATTERN PIECE and instructions for creating a ruffled mane from baby clothing. Any thin fabric that can be gathered into a ruffle can be used for the MANE – DON’T interface it ~> or it will be too stiff to gather into a ruffle!
Cut the MANE PIECE on the fold so you have one piece 39cm (15 inches) long.
TIP: You can gather a piece of ribbon to make a ruffle 13cm (about 5 inches) long for a MANE or buy some pre-ruffled ribbon from a fabric/haberdashery shop. (Make sure you use SOFT ribbon so it doesn’t feel scratchy!)
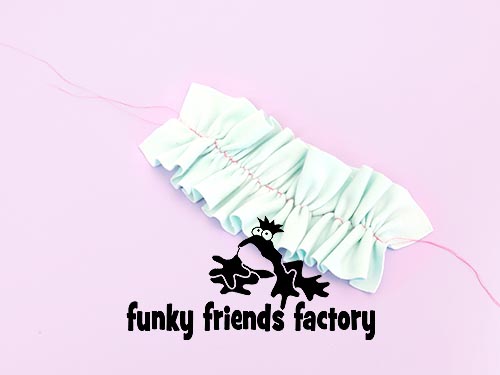
STEP 34b
Sew a gathering stitch (an extra long stitch) down the centre of the MANE PIECE, as shown by the dashed line in the pattern markings. Pull the thread to gather the MANE PIECE into a ruffle 13cm (about 5 inches) long.
STEP 34c
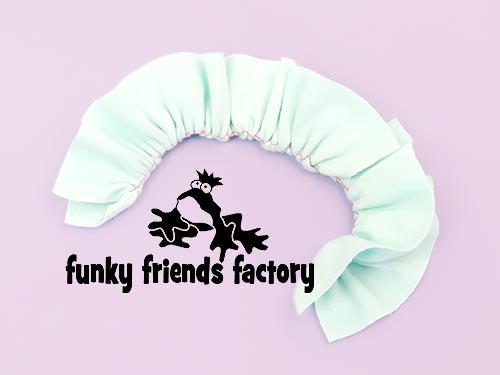
Fold the ruffle in half along the gathering line, so the MANE forms a double layer.
STEP 34d
Check that the ruffle will fit between the HORN and the neck seam, adjust the length as needed and pin the MANE in position.
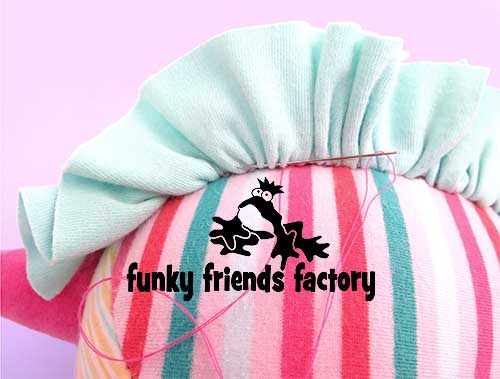
STEP 34e
Hand sew (or use fabric glue) to secure the MANE in place.
TIP: If you find hand-sewing difficult you can use fabric glue!


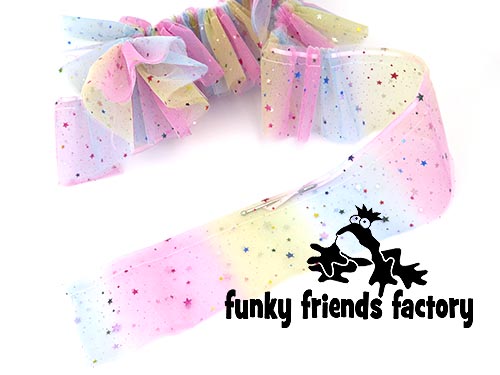
Tutu:
STEP 35a
Note: I needed netting 15x180cm (6x70inches) wide BUT my netting fabric was only 60cm (about 70inches) wide. So I used 3 pieces 15x60cm (6x23inches)wide. I didn’t join them, I simply threaded them onto the ribbon, one after the other, and pushed the edges of the netting together over the ribbon to make it look nice! *
Fold the netting in half lengthwise and sew a line of stitching 1cm (½inch) from the folded edge to make a casing.
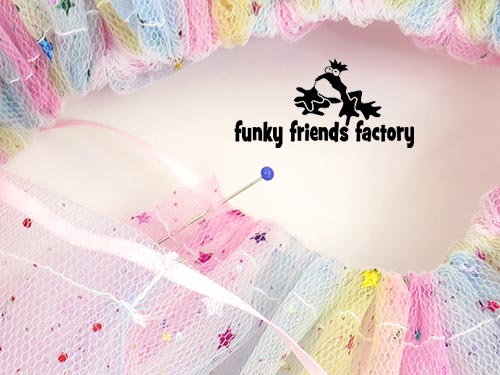
STEP 35b
Thread some 5mm (¼inch) thick ribbon through the casing and gather the netting to fit nicely around the unicorn’s body like a tutu. (* See note above.)
STEP 35c
Sew the netting to the ribbon at each end of the tutu to hold the tutu in shape, leave enough ribbon to tie the tutu on the unicorn, then trim off the extra length. Place the tutu on your unicorn and tie it in place.
Felt Flowers (or stars)!
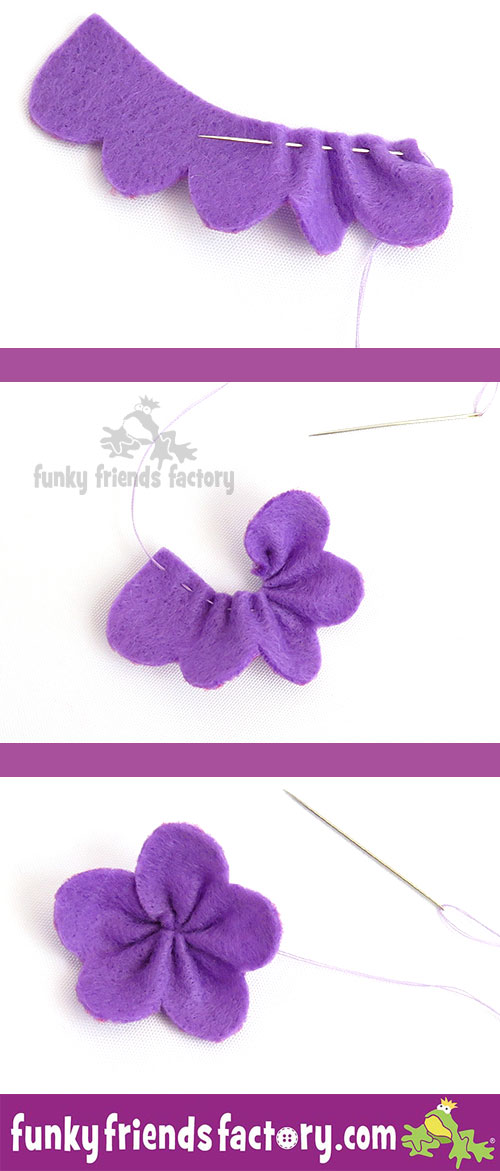
STEP 36
Cut some FLOWERS (or STARS) to sew/glue them on your Unicorn’s head.
***These photos show how to gather the 5 petal flower
and sew it together to make the felt flowers.***
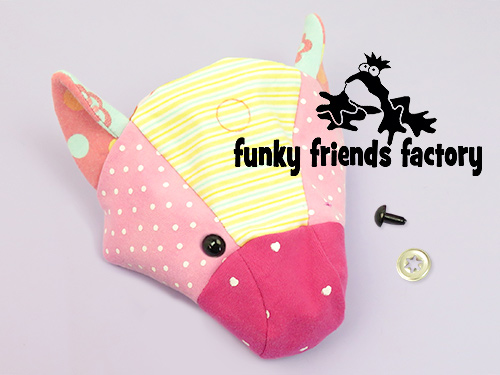
Your Keepsake Unicorn is ready to LOVE!
![]()
Come join the fun on Facebook!
When you’ve made your own unicorn keepsake – come and post some photos of your NEW Funky Friend for me to see on my Funky Friends Factory Facebook page.
You could WIN a FREE PATTERN in the MAKER OF THE MONTH Pattern Giveaway!
I can’t wait to see the Funky Friends you sew!

bye for now,
Pauline
![]()
