
I made this photo tutorial so you can see how to sew my Easter Bunny Sewing Pattern ~> scroll down for step-by-step photos!

*** PLEASE NOTE – this is ONLY a PHOTO TUTORIAL ***
The FULL PATTERN IS NOT included here.
It is NOT A FREE PATTERN!I have made this photo tutorial so people who have purchased the pattern can SEE how to sew my Easter Bunny! (I wanted to explain this so you are not disappointed if you have found this page via a search engine and not from the link in my Easter Bunny toy sewing pattern!)
Choose some fabric to sew an Easter Bunny Toy!
I had this adorable yellow Easter bunny fabric and teamed it up with some Melly & Me fabric (Where the wind Blows fabric from Riley Blake) for mine BUT these Easter Bunnies will look great in ALL sorts of colours!

Let’s start with some bunny ears!
STEP 1
Sew the EAR PIECES together in pairs. Turn them right sides out and pin the base of the ears closed.
*** PLEASE NOTE ***
I used the SAME fabric for ALL 4 EAR PIECES for this bunny BUT I think it looks much nicer if you ONLY cut 2 EAR PIECES from the contrast fabric (so it looks like the bunny has a different colour inside it’s ears.) You can decide which way YOU like best!

STEP 2
Fold the EAR PIECES as shown on the pattern markings.
TIP: Make sure you fold them to opposite sides to make a RIGHT and a LEFT ear!!!


HEAD:
STEP 3a
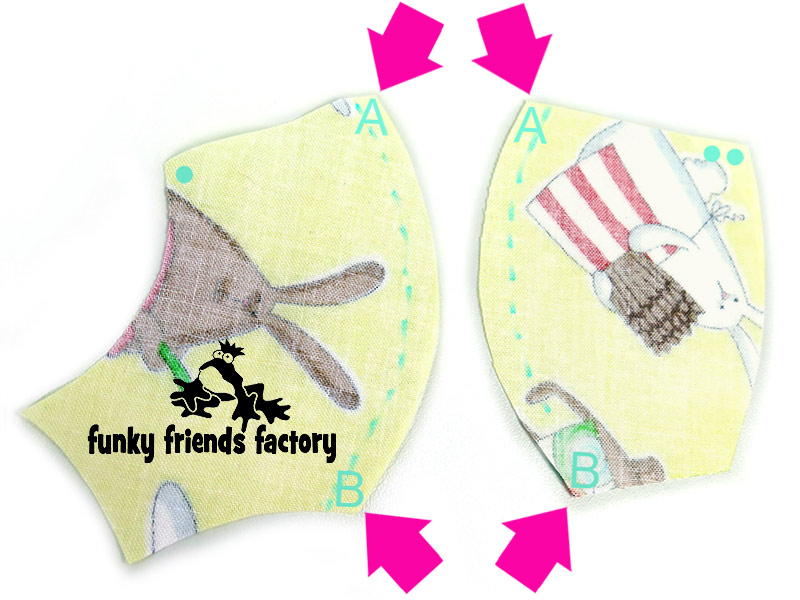
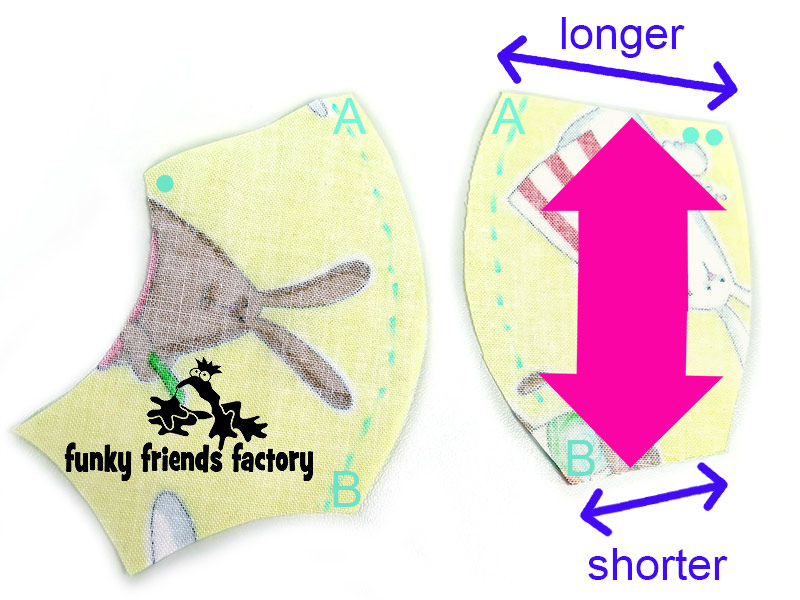
Pin one CHEEK 1 PIECE to a CHEEK 2 PIECE, matching point A and B.
TIP: PLEASE BE CAREFUL: It is VERY EASY to sew the CHEEK 1 PIECE upside down – if this happens, the head and body won’t fit at the neck seam!
To make sure you get the CHEEK 1 PIECE and CHEEK 2 PIECE pinned the right way up, write the letters on the fabric pieces, then match A and B, as you pin them together. If you do this, you are guaranteed to get them the right way up!
STEP 3b
Double check you have the CHEEK PIECES pinned the right way up BEFORE you sew them together. (The longer edge of CHEEK 1 PIECE must be at the top.)
Sew the CHEEK 1 PIECE to the CHEEK 2 PIECE, sewing from A – B. Clip the seam allowance to make the seam turn out nice and smooth.
STEP 3c
Use a turning tool to turn the seams very well. (I like my chopstick!) Run the chopstick back and forth along the seam on the wrong side of the fabric.
STEP 3d
Repeat steps 3a- 3c for the other CHEEK 1 and CHEEK 2 PIECE.


STEP 4
Fold the FACE PIECE in half and sew the dart at T.
* I have drawn a black dashed line in the photo below to show you where to sew the dart.

STEP 5a
The CHEEK1 & CHEEK2 PIECES are joined to the FACE PIECE.
STEP 5b
Pin and sew the CHEEK1 & CHEEK2 PIECES to the FACE PIECE, one side first, matching point A and the dots of the pattern markings. Do the same on the other side.


STEP 6
Pin and sew the SNOUT PIECE to the FACE PIECE & CHEEK 2 PIECES. Sew from D – C – D (on the other side).
TIP: Use LOTS of pins for this seam to get the nose nice seam nice and smooth, without any wrinkles!


STEP 7
Fold the SNOUT PIECE and sew the SNOUT PIECE and CHEEK 2 PIECES closed at the front. Sew from E – D – G.

STEP 8
Pin the EAR PIECES to the FACE PIECE so that the fold of the dart is facing (touching) the FACE PIECE.

STEP 9
Pin and sew the HEAD PIECE to the FACE&CHEEK PIECES, with the EARS in between, matching point T at the top of the head.

STEP 10
If you are using craft eyes, insert them now. (I have got the brown 15mm craft eyes in stock now!)

ARMS & LEGS:
STEP 11a
Sew the ARM PIECES together in pairs leaving a gap open for turning and stuffing. Clip the seam allowance and use a chopstick to smooth the seams.
STEP 11b
Pin the ARM PIECES closed at the top so that the seam is in the centre. Repeat for the other arm.


STEP 12a
Sew the LEG PIECES together in pairs leaving a gap open for turning and stuffing. Clip the seam allowance and use a chopstick to smooth the seams.
STEP 12b
Pin and sew the FOOT PAD PIECES to the LEG PIECES. Use LOTS of pins and clip the seam allowance very well before turning the LEGS right sides out.
STEP 12c
Pin the LEG PIECES closed at the top so that the seam is in the centre. Repeat for the other leg.


BODY:
STEP 13
Fold the TUMMY PIECE and sew the dart at K.

STEP 14a
Pin the ARMS to the TUMMY PIECE with the stuffing gaps facing up towards you.
STEP 14b
Pin the LEGS to the TUMMY PIECE with the stuffing gaps facing up towards you.


STEP 15a
Sew the BACK PIECES together from J – K. I have added a black dashed line, in the photo below, to make it clearer for you to see where to sew.
STEP 15b
Pin and sew the BACK PIECES to the TUMMY PIECE with the ARMS and LEGS in between.


STEP 16
Pin and sew the HEAD & CHEEK PIECES to the TUMMY & BACK PIECES. I find the easiest way to do this is to turn the HEAD & CHEEK PIECES right sides out before you pin this seam. I have drawn the black dashed line in the photo below so you can see where to sew the neck seam.

STEP 17
Pull the head back out of the body. Pin the HEAD PIECES and BACK PIECES together at the back and sew the bunny closed, leaving a gap for stuffing.

STEP 18
Pin and sew the dart in the BACK PIECES at J.

STEP 19
Turn your bunny right sides out…
ooh it’s getting EXCITING now!!!!!

STEP 20
Stuff the head and body making sure that the snout and cheeks are very firmly stuffed. Stuff the arms and legs. Sew the stuffing gaps closed on the ARMS, LEGS and BACK PIECES with a ladder stitch (blind stitch).

STEP 21
Cut the NOSE PIECE from felt and sew this onto the SNOUT PIECE, with embroidery thread and a blanket stitch. I like to use a felt colour that will stand out from the fabric used for the SNOUT PIECE.
TIP: I like to trace my felt pieces with a fabric marker. If you don’t have one ~ go to my blog for other methods for cutting out felt.


TAIL:
STEP 22
Use a double thread and a running stitch to gather the TAIL PIECE to form a cup shape. Fill this with stuffing and pull tightly to gather the TAIL PIECE to form a ball. Sew the tail closed and finish off securely with a knot. Sew the tail in place, just above the dart in the BACK PIECES, using ladder stitching.

Your Easter Bunny soft toy
is ready to LOVE!!!!

Come join the fun on Facebook!
![]()
When you’ve made your own toy elephant – come and post some photos of your NEW Funky Friend for me to see on my Funky Friends Factory Facebook page.
You could WIN a FREE PATTERN in the MAKER OF THE MONTH Pattern Giveaway!
I can’t wait to see the Funky Friends you sew!

bye for now,
Pauline
![]()
